This is where your wire crochet adventure begins with the ISK technique

Language

  • Log in
  • Cart (0)
  • Checkout
  • Home
  • Where do I start
  • Learn Wire Crochet 
    • Patterns 
      • Beginners level
      • Intermediate level
      • Advanced level
      • NECKLACES Patterns
      • RINGS patterns
      • BRACELETS patterns
      • EARRINGS patterns
      • HOME decor patterns
      • Combos
      • Free tutorials
      • Spanish patterns
      • German patterns
      • Hebrew patterns
      • Italian patterns
      • French patterns
      • Dutch patterns
      • Portuguese patterns
    • DIY Kits 
      • Single item kit
      • Combo kits
      • Tools
    • Supply 
      • Tools
      • Wire
      • Findings
    • Learn Wire Crochet
    • Where do I start
    • Clearance
    • Workshops
    • Online class
  • Jewelry 
    • Hoop earrings
    • Dangle earrings
    • Stud earrings
    • Necklaces
    • Cuff bracelets
    • Bangle bracelet
    • Gemstone jewelry
    • Rings
    • Home Accents
  • info 
    • Shipping
    • FAQ
    • Press
    • about us
    • Track your order
    • Gallery
  • Blog
  • Online class 
    • Wire Crochet Book
    • Online class
  • Language

Wire Crochet news
Home   Wire Crochet news   Make your own iphone tripod

Make your own iphone tripod

Make your own iphone tripod

As you well know, after having been selling jewelry pieces for many years and after quite a few debating, I decided a while ago to share my knowledge and put up a whole range of tutorials for my designs.

I really wanted my videos to be the most precise and to be able to offer the best crafting experience with loads of pictures and close ups. However, I was challenged by the fact that... I only have two hands!

This would probably answer your question in case you were  wondering how I got to create my own Iphone tripod...

I needed an iphone tripod and couldn't wait, so you know what... I just made one out of foam boards (I wasn't nicknamed Robinson Crusoe for nothing when I was a kid!) and as I became a tutorial fan, here it comes, the full FREE instructions on How to Make a Tripod for Iphone (which obviously work as a tripod for smartphones in general...):

It works so well for me, and the neighbours have started borrowing it too , so I guess it should work well for you too. 

Tools and supply needed to make an iphone tripod:

- Foam board ( 0.19" thick or 0.5cm) total size :9.5" by 23" or 24cm / 60cm ,
- Cutting board
- Glue gun
- Utility knife
- Pencil

- Marker (optional)

The dimensions I will give you are the one I used for filming while sitting at my work table, in order to get easy close ups. You may want to change the height according to your own needs. and plan your own customised iphone tripod.

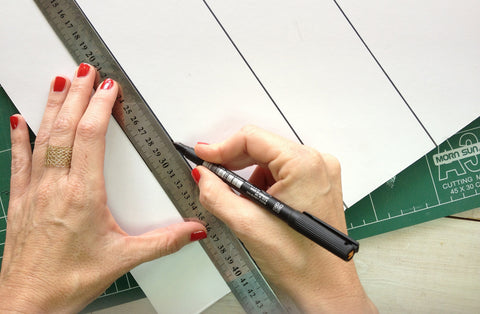
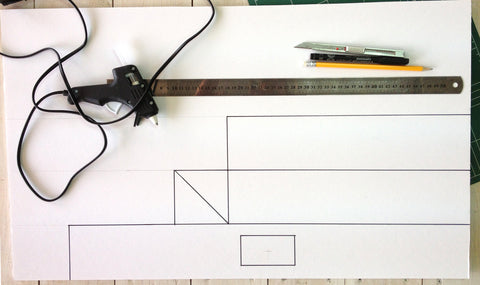
With the pencil and ruler, draw the following elements on your board, as seen on the pictures below :

2 stripes of : 14" by 3.2" or 36cm by 8cm
1 stripe of: 23" by 3.2" or 60cm by 8cm
2 triangles: 3.2" by 3.2" or 8cm by 8cm


At the center of the long stripe, mark a window in the size of 3.2" by 1.7" (8cm by 4.5cm)

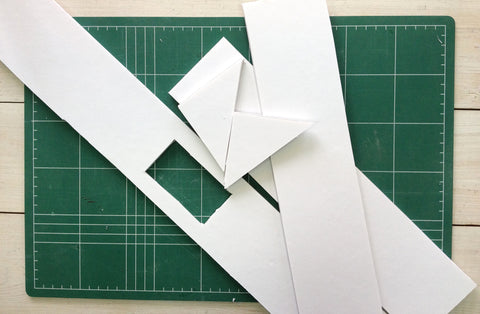
then, with the utility knife, cut the foam board along the draw plan that you made.


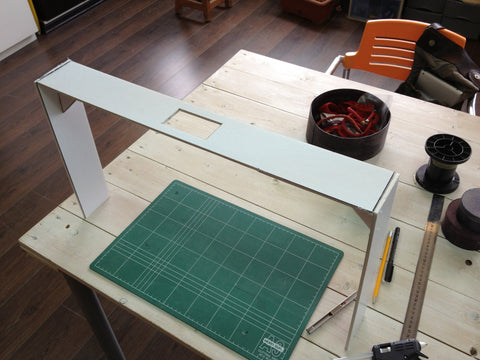
Now that you have all of the tripod for iphone parts needed, glue the 2 triangles at both ends of the long stripe.

The 2 shorter stripes will be then glued to those triangles, at both ends.

Make sure to put glue both on the triangle edge and the end of the long stripe.

And your done !!!

You can now smart off with your new skill and make a tripod for iphone as you wish!

All the photos (except the last) included in this tutorial have been taken using this iphone tripod (or bipod to be linguistically exact!). 

to see an example of another video I filmed , hop over to the HOW A CLEOPATRA WIRE CROCHET RING IS MADE ....  post I published  last week.

enjoy !

Yael aka Yoola


Tweet Share Pin It Email

Also in Wire Crochet news

The YoolaStudio program is all set up ... would love to see you there !

Continue Reading

The Magic Wand You Didn’t Know You Needed

Continue Reading

Asherah: Weaving Connections, Tradition, and Feminine Strength – In Honor of Ruth Dayan

Ashera wire crochet sculpture by YoolaDesign

Continue Reading

Info
  • Search
  • Terms & Conditions
  • Privacy Policy
  • Shipping and Policy
  • Return policy
  • Track your order
  • Your privacy choices
Sign up for our newsletter

Sign up for insider tips, special offers, limited editions & more...

Contact us !

info@YoolaDesign.com


Language

© 2025 Yooladesign. Powered by Shopify

visa mastercard jcb discover applepay googlepay paypal